Warning: Improper erection, dismantling or use of EZ-RAX scaffold storage and transportation system may result in serious injury or death! Erectors, dismantlers, and users of Bil-Jax storage units must read and fully understand these Safety Rules and Instructions as well as all federal OSHA, state, and local regulations pertaining to this equipment prior to its use. For any questions concerning the proper erection, dismantling, or use of Bil-Jax storage unit, please call 1-800-537-0540 before use.
For proper assembly, your basic Storage Unit must be comprised of 7 individual parts, plus one hardware kit and three ratchet straps.
EZ-RAX Parts
| Letter | Part | Qty. |
|---|---|---|
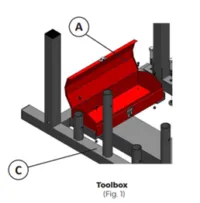
| A | Toolbox | 1 |
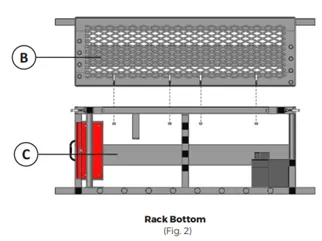
| B | Frame Rack | 1 |
| C | Accessory Rack | 1 |
| D | Bottom Center Brace | 1 |
| E | Top Center Brace | 1 |
| F | Center Vertical – R | 1 |
| G | Center Vertical – L | 1 |
Step 1 - Attach EZ-RAX Tool Box
Attach Tool Box A to Accessory Rack C, shown in Fig. 1, using the small bolts and lock nuts from the hardware kit.
Step 2 - Attach Accessory Rack
Attach Frame Rack B to Accessory Rack C, shown in Fig. 2, using the large bolts and lock nuts from the hardware kit.
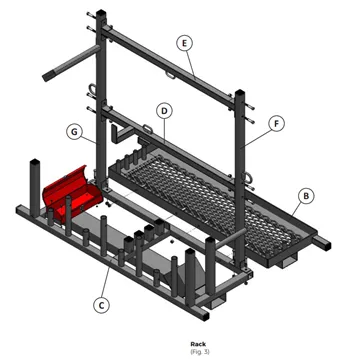
Step 3 - Attach Scaffold Support Frame
- Attach the two vertical parts F and G to Accessory Rack C, shown in Fig. 3.
- Attach the two center braces D and E to the vertical parts F and G, shown in Fig. 3.
Step 4 - Load and Secure Casters
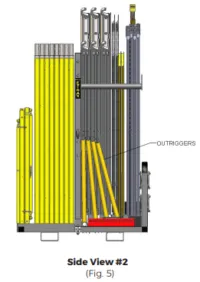
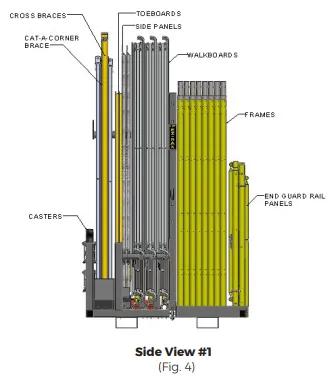
Load the EZ-RAX with the load capacity parts from page 2. Place casters (with snap pins removed) on the rack, and secure in place with the snap pins. See Fig. 4 and 5 side views for reference.
Step 5 - Load Scaffold and Secure with Stability Straps
- Use 12’ strap – attach to ring A and wrap around the frames and end guard panels, then attach to ring B. Tighten strap. See Fig. 6.
- Use 8’ strap – attach to ring C and wrap around walkboards, cross braces, side guard rails, and toeboards, then attach to ring D. Tighten strap. See Fig. 6.
- Use 8’ strap – attach to ring C and wrap around walkboards, cross braces, side guard rails, and toeboards, then attach to ring D. Tighten strap. See Fig. 6.
- Use 8’ strap – attach to ring C and wrap around walkboards, cross braces, side guard rails, and toeboards, then attach to ring D. Tighten strap. See Fig. 6.
Warning: To prevent damage to building overhangs or canopies, always be aware of the overall clearance height of the EZ-RAX once it is loaded on the transport vehicle.